Thursday, December 22, 2016

TR-606 Sync and Run/Stop Repair

So, I got a 606 with sync and start/stop issues. It would always be in play mode, but the "RUN" LED wouldn't turn on. Neither the "RUN" button nor the DIN sync in/out would do anything.

Looking at the schematic, there's a flip-flop latch (IC2b) that seems to hold the play/paused status. When probed, no surprise, its output never changed. Working backward, the schmitt inverter that clocks it, never changes its output either. Back one more step and Q1, that buffers/inverts the run/stop input jack, doesn't change its output by much either.


Q1 is outputting a max of 1.3V, not enough to register a change on the schmitt. Time to try replacing it. The part reads "603 31F", conflicting with the schematic. I think it's actually a 2SC2603 as used in the Boss DR110, so I used one of those. The LED now works!

It's still stuck in play mode though. Looking at the schematic more, I realise the flip-flop doesn't directly tell the CPU if we're in play mode or not. It goes through Q4, SW1, Q5, IC3 and some passives. Q4 and SW1 seem ok because they're part of the path to the now working LED. So, Q5 was the first candidate. Turns out it had the same low-output problem. Slap in another new transistor and everything works!

Both of these transistors are directly connected to input jacks, so I suspect some external voltage killed 'em. These are probably prime candidates for replacement in any unit that has similar problems.


Sunday, September 11, 2016

Pearl DRUM-X Schematic

Pearl's DRUM-X is a somewhat overlooked, five voice, analog drum synthesizer. It's intended to be connected to drum pads, similar to the old Simmons SDS line.

I'm generally interested in analog drums, so I wanted to try understanding the design. Unfortunately, there doesn't seem to be a copy of the schematic anywhere. So, I took some photos of the board and pieced together a schematic. The five voices are nearly identical, so only redrew one. Here it is:


To give a general summary, each voice has 3 VCOs, 1 Lowpass VCF, 2 Envelope generators and 5 VCAs

If you compare schematics, it looks like it evolved out of the Syncussion. The strange transistor-pair and CMOS inverter clusters have been (mostly) replaced with more normal OTAs. Some portions of the schematics are still nearly identical. The envelope generator and final VCA for example.

Another part of the evolution is the presence of CMOS bilateral switches. When switched at a high frequency, they act as duty-cycle controlled resistors. If switched by a VCO with voltage controlled duty-cycle, they act as voltage controlled resistors.
There are two 4016s per voice, used to voltage control the various VCO pitches and filter cut. Strangely, they are run on a +5V rail, while the rest of the system runs on ±8V.


VCOs

There are three identical, but differently tuned VCOs. One is the regular, fundamental tone of the drum. Two serve to generate the "overtone" signal, a somewhat atonal sound that can be mixed with the fundamental.

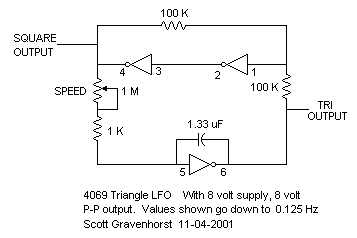
The VCOs are a pretty standard 4069 square/triangle oscillator design. In this case, only the triangle output is used. Most designs include a potentiometer for pitch adjustment. These instead use a 4016 switch to implement voltage control. They cannot be tuned separately due to sharing the same CV signal.


VCAs

All but the main VCA use the same LM13700 design. It's the bare minimum, leaving out the buffer and bias diodes. Here it is compared to the example from the datasheet:


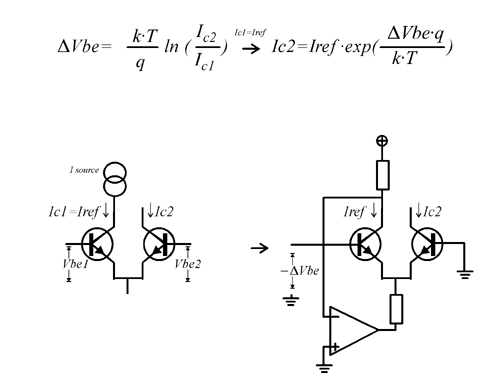
The transistor pairs driving them are more interesting. I've only ever seen them in hand clap circuits. They form a differential pair, but are biased to be an exponential current source.


The transistor pairs driving the "Attack VCA" and "Over-T VCA" (pairs T1 and T4) are also acting as VCAs themselves. They're multiplying the CV at the base with the Envelope CV coming in the emitter. This allows voltage control over the volume without changing the envelope.

The pairs driving the "VCO/Noise Bal" are opposites of each other. That is to say, one pair is inverting and the other is non-inverting. This lets one CV signal mix the VCO and Noise signals relative to each other.

Over Tone VCA

This VCAs serves to mix out the over tone signal based on the main envelope. This gives more over tone signal at the start of the sound and less at the tail.

Attack VCA

This VCA lets in a quick burst of noise to simulate a real drum transient.

Main VCA

The main VCA is a differential pair + current source. It uses a variation on an exponential converter to multiply the volume CV with the main envelope and drive the main VCA.

Envelope Generator

This is a decay-only envelope generator. C20 is the core of it. It's charged by a trigger through T5 and drained by Q2.

Transistor pair Q2 and Op-Amp IC6B also look like a variation on an exponential convertor. They serve as a current sink to voltage control the draining of C20(decay).

T6, C22 and R55 form a second, simpler envelope generator. It works the same way, minus voltage control.

VCF

There is only one VCF per voice. The entire mix is passed through this filter before hitting the main VCA.

It's a standard Sallen-Key low-pass filter. The resistive elements are realised with more 4016 switches. IC15B biases it to a virtual ground sitting at +2.5V. This is so the signal falls within the 4016's supply rails.

4016 CV

As I've said, the 4016 switches need to be given a duty-cycle (PWM) signal to change their resistance. This is accomplished by generating a sawtooth wave (labeled PWM_4016) and comparing it to a CV signal.

For example, the filter CV (FLT_CV) is fed into buffer IC8C, passively mixed with the main envelope and biased toward the positive rail. This signal, along with our sawtooth are fed into comparator IC4B and output to the 4016.

When the CV signal is higher than the sawtooth, the output is high. When the CV is lower than the sawtooth, the output is low. This page demonstrates it nicely with this image:

The result is a pulse-width modulated wave that reflects the incoming CV.

CV Mux

The control logic (not pictured) generates CV signals and multiplexes them over one connection: MUX_CV. The CV's destination is defined by signals 4051_A, B and C.

The CV Mux circuit de-multiplexes the CV signals from the control logic. It select the output that corresponds to the 4051 signals and connects it to the incoming CV signal. This charges a capacitor at the output. Once the multiplexer moves on to the next output the previous output goes hi-Z. This prevents the multiplexer from draining the capacitor and allows the capacitor to retain its voltage.

In this way, the multiplexer is also a multi-output sample and hold, grabbing voltages and holding onto them.


Noise

The noise circuit is part of the control logic, so is not pictured with the rest. It's built around a reverse biased 2SC1815 NPN transistor, similar to the 808's. It's lowpass filtered before being sent to the separate voices.


Odds and Ends

There are some unconnected and strangely arranged components. I'm guessing these are utilised in the other voice configurations.

The most obvious one is IC13 (4016). It has two switches connect to the attack VCA's output and not much else. They look like the start of a sallen key high-pass filter, but there's no op-amp connected to them.

Here is a block diagram of one voice:


The full schematic images and eagle files are on my github here.

Monday, July 4, 2016

Resurrecting "C Programming for MIDI"

I've been playing with a DOS computer that I recently added to my studio. It's pretty limited, but it still speaks MIDI.

Finding old software for it can be difficult, but programming books are still floating out there. Enter "C Programming for MIDI". It details an Alpha Juno patch editor/librarian that uses an MPU-401 interface.

I've tried to find the original files or a copy of the floppy, but they're nowhere to be found. So, I had to copy the program out of the book.

The book has a number of mistakes: typos, wrong variable names, missing values/functions, etc. I fixed enough typos, and added few enough, that it compiles and seems to run correctly.


The source and binary are on github here.

It's almost useless today and was fairly basic in its day, but I think it's a decent starting point for making a DOS MIDI program.

Saturday, June 18, 2016

CZ 1000 Noise Fix (DAC Adjustment)

So I picked up an as-is CZ 1000. It started off terribly distorted, but after jumping a few corroded traces it started to sound more normal. Still not right though. Some presets had an odd harshness and some a "zipper" sound as they decayed.

It might not come across on soundcloud, but here's an example.


After some searching I found several people discussing similar problems. Each time the solution was to adjust the DAC's offset voltage. The schematics can be found easily and they depict the DAC portion like this:


VR2 is the obvious candidate, but turning it had no effect. I started looking at the board and it turns out that there is another, less visible trim pot (VR4) up near the MIDI jacks. I can't even find it in the schematics, but once you get it in range (12 o'clock in my case), VR2 starts being helpful.

If VR2 is too far clockwise, you get more of the aliased "zipper" sound and too far counter-clockwise you get a more hissy/breathy sound. I can't find a specified voltage nor a test point for calibration, but I found it easy enough to calibrate by ear.

I had to take the CZ completely apart for other repairs. The screen had missing rows, but almost any HD44780 based LCD works as a replacement. Some buttons were unresponsive, but contact cleaner made them operable.
While I had it disassembled I took some photos of the trimmer locations. They're on the main board appropriately marked "M4152-MAIN".
To be clear, you only need to remove the bottom of the case to adjust things. Casio was nice enough to provide some holes so you can access the trimmers from the underside of the board.

Monday, June 13, 2016

DR 220 Mods

A while ago I had the opportunity to work on a friend's DR-220. Researching it I found a copy of the service manual, but not much else. I started experimenting with it and developed some relatively simple mods. I've already documented the sound ROM's format, but I never got around to the rest.

Here's a rough schematic of the parts I've added:
Starting at the top left, we have the trigger conditioners. They attach to the internal tom/kick triggers and regulate them to 5V 1ms trigger outs. For longer triggers R2/C2 and R15/C7 can be increased.

To the right there are two envelope generators. They replace the built in envelopes and allow you to change the decay and filter cut of the tom/kick. The envelopes are buffered by a TL072 that has to be run on the 9-12V rail. There wasn't enough headroom with the regular 5V rail.

Next is just the DB25 connector I used to attach the breakout box.

Below that is an ATTiny85. It accepts a slow, Volca-type clock input and produces a doubled clock with swing adjustment.

At the bottom left another Tiny85 and 4046 work as a new clock generator. I replaced the 2.4MHz crystal with a 74HCT4046 to allow CV pitch. I use the HCT line specifically since other logic families aren't rated in the multiple-megahertz range.
There is a catch with the new clock. The original circuit uses the ASIC to generate multiple clocks/timer interrupts for the CPU. When you over/underclock the ASIC, you affect the CPU. It can run over a decent range, but becomes erratic or unresponsive at extremes.
I chose to sever the clock connections and substitute the Tiny85 as clock gen.

Finally there is a simple buffer that allows for a separate out. This can be duplicated 6 times to provide 6 output groups.

Most of the components fit in the battery compartment and the rest went into the breakout box. Pictures below:


Sunday, May 1, 2016

Werkstatt Breakout

Here's a quick and dirty solution to the Werkstatt's desperate need of proper connectors. Moog has their offering, but I think this is perfect DIY fodder.

First I chose the connections I wanted to breakout and which should get adjustment knobs.
I pulled some potentiometer values from a hat and started making a schematic.
There isn't a nice header for ground, so I added a 1/4" connection just for the ground connection.
I also added a zener to protect the gate input. Note: the Werkstatt needs to be modified to safely accept a gate/trigger input. I simply severed the envelope generator's connection to the sustain switch.

Here's my schematic:

I like the roominess of 1590BB enclosures, so I used one for this project. I mocked up the parts in Inkscape and threw together this layout:

I printed it out as a template and drilled the case. Some paint, solder and dymo-tape later it looks like this:
\